1. I chose a blank white template - starting with a blank template when creating from scratch means you do not end up having to change the preset settings of a template.
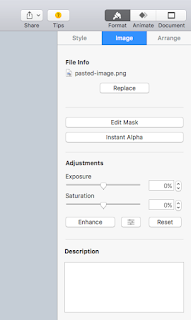
2. I selected a background - I found an image and inserted this in the background by using the control "Back" (this sent the image to the back of other images). I then wanted to reduce the opacity of the image so selected Format on the top right of the screen and then the button on the right of Enhance (here you can change the opacity, brightness, saturation etc of the image).

3. Next I wanted to create a title - I selected the control "Text" and then once again went to Format to select the font, border and colour etc.
4. Once I had the titles and background I went selecting my images - many of these had backgrounds so I used the "Instant Alpha" and "Edit Mask" controls to select the parts of the image I wanted and remove any unwanted sections. I also used the "Edit Mask" control to make the effect of eating the bread. To do this I first of all had to draw the desired section to be masked out by using the "Insert - Line - Draw with Pen" function. I then had to mask that section out by selecting both the image and section I had cut out and the clicking "Edit Mask".
5. Once I had created the slides I then selected "Play - Record Slideshow" - here you can record audio or simply record how you would like the slides to transition. After recording I was then able to export the recorded version into QuickTime Player and then put it into iMovie. In iMovie I was then able to add in audio and sound effects.
Here is my completed animation:
For more top tips click on the following links:
Thanks for sharing your simple steps and cool little animation! I could clearly see your instant alpha, and the layering to make the sandwich. Your little ones will love this, and it is educational - might have to use in Health :)
ReplyDeleteThank you Georgia! Was great to learn how much we can do on Keynote! :)
DeleteWhat a super post Steph. Your animation looks effortless! Between your explanation and our collective knowledge of what went into this , we can see that you demonstrated heaps of tools and slick skills to create this. Well done.
ReplyDeleteThank you Dorothy! Was great to have your expertise to guide us through Keynote - we are so lucky to have Fridays to explore all the digital tools we have! I am looking forward to getting creative with Keynote for our class site and blog next year :)
Delete