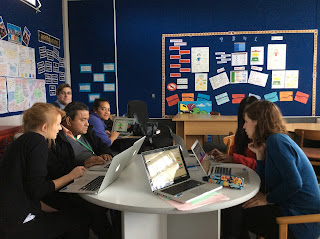
Today we were given the opportunity to experience what it is like to both create and present an ignite talk. I had first seen these style of presentation at the Manaiakalani Hui and it seemed like both an exciting but daunting way to present. You are given 5 minutes with 20 slides, each which must be 15 seconds long. The presentation automatically runs through the slides, so ensuring you have enough to say but also not too much is crucial.
We each selected a topic out of hat - I was given the topic Chrome Experiments with the link to this article. My topic fascinated me so much that I was drawn into a trail of exploring a new world of both random and exciting resources, forgetting that our time for creating both the slides and speech was limited. By presentation time I had only 12 slides and a speech which did not exceed my first two slides. I took on advice to create some simple filler "one-word" slides and the "wing it" approach to presenting. If I were to present again I would hopefully have much more time and would definitely take the time to write and rehearse a speech. This was both a very fun and exciting experience and I hope to be able to present another ignite talk in the future!
Welcome to my blog! This year I am teaching year 3 in a collaborative 1:1 digital iPad class at Pt England School in Auckland NZ.
Friday, 23 September 2016
Wednesday, 21 September 2016
Inquiry - Increasing vocabulary through class stories
Over Term 3 we have been taking the time to read our class lots of stories that they have chosen at the library. They all love listening to stories and will often seek clarification on new words they hear. Seeing they are so engaged during this time I am wanting to find a way to use this time to build on their curiosity. I have thought about maybe creating a word wall or a word map but am still trying to think of a way to make it a quick lesson that does not take away from the reading for enjoyment factor. If you have any suggestions please comment below!
Friday, 16 September 2016
Exploring the endless possibilities in Keynote!
Today we had the opportunity to explore Keynote and I was surprised to find out how much you can do in Keynote (I had always thought it was a simple Mac version of Powerpoint). Not only can you create slideshows and animations, Keynote works as an amazing editing tool for photos, creating labels, logos and much more. To explore the various features I decided to create an animation on how to make a healthy sandwich. Last week in class we had made healthy sandwiches as part of inquiry and the students had come up with various words groups to explain the ingredients. The following steps explain how I built my animation:
1. I chose a blank white template - starting with a blank template when creating from scratch means you do not end up having to change the preset settings of a template.
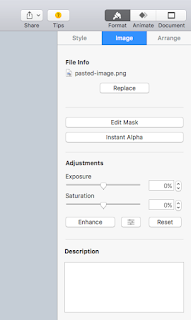
2. I selected a background - I found an image and inserted this in the background by using the control "Back" (this sent the image to the back of other images). I then wanted to reduce the opacity of the image so selected Format on the top right of the screen and then the button on the right of Enhance (here you can change the opacity, brightness, saturation etc of the image).

3. Next I wanted to create a title - I selected the control "Text" and then once again went to Format to select the font, border and colour etc.
4. Once I had the titles and background I went selecting my images - many of these had backgrounds so I used the "Instant Alpha" and "Edit Mask" controls to select the parts of the image I wanted and remove any unwanted sections. I also used the "Edit Mask" control to make the effect of eating the bread. To do this I first of all had to draw the desired section to be masked out by using the "Insert - Line - Draw with Pen" function. I then had to mask that section out by selecting both the image and section I had cut out and the clicking "Edit Mask".
5. Once I had created the slides I then selected "Play - Record Slideshow" - here you can record audio or simply record how you would like the slides to transition. After recording I was then able to export the recorded version into QuickTime Player and then put it into iMovie. In iMovie I was then able to add in audio and sound effects.
Here is my completed animation:
1. I chose a blank white template - starting with a blank template when creating from scratch means you do not end up having to change the preset settings of a template.
2. I selected a background - I found an image and inserted this in the background by using the control "Back" (this sent the image to the back of other images). I then wanted to reduce the opacity of the image so selected Format on the top right of the screen and then the button on the right of Enhance (here you can change the opacity, brightness, saturation etc of the image).

3. Next I wanted to create a title - I selected the control "Text" and then once again went to Format to select the font, border and colour etc.
4. Once I had the titles and background I went selecting my images - many of these had backgrounds so I used the "Instant Alpha" and "Edit Mask" controls to select the parts of the image I wanted and remove any unwanted sections. I also used the "Edit Mask" control to make the effect of eating the bread. To do this I first of all had to draw the desired section to be masked out by using the "Insert - Line - Draw with Pen" function. I then had to mask that section out by selecting both the image and section I had cut out and the clicking "Edit Mask".
5. Once I had created the slides I then selected "Play - Record Slideshow" - here you can record audio or simply record how you would like the slides to transition. After recording I was then able to export the recorded version into QuickTime Player and then put it into iMovie. In iMovie I was then able to add in audio and sound effects.
Here is my completed animation:
For more top tips click on the following links:
Friday, 9 September 2016
Ubiquitous learning and film editing!
As part our our "Connecting with Manaiakalani" session this morning we discussed ubiquitous learning - this is creating learning that extends beyond the 9am - 3pm boundaries. After all if we can encourage students to learn anywhere, anytime and at any pace, then we are creating greater opportunities for learning to occur. It also encourages students to see learning as a life-long process and not something that only happens within the walls of the classroom. In our Year 1 class we encourage learning at home by sending home junior readers and also getting students to take home examples of what they have learnt to discuss at home. The discussion this morning definitely made me realise the need to think more deeply about how I could encourage ubiquitous learning with my young learners.
The rest of our day was allocated to editing our movies for Manaikalani Film Festival - one extremely handy tip I learnt in iMovie was HOW TO CREATE A FREEZE FRAME FROM A VIDEO - simply right click on the video footage in iMovie and select Add Freeze Frame. Watch this space over the next few months to see the release of our class movie!
The rest of our day was allocated to editing our movies for Manaikalani Film Festival - one extremely handy tip I learnt in iMovie was HOW TO CREATE A FREEZE FRAME FROM A VIDEO - simply right click on the video footage in iMovie and select Add Freeze Frame. Watch this space over the next few months to see the release of our class movie!
Saturday, 3 September 2016
A few firsts - Toolkits and Manaiakalani Film Festival
This week I presented my very first Toolkit on Screencasting. Danni and I created a presentation to give some ideas on what screencasting could be used for and then planned for the rest of the session to be hands on "give it a go" time. Unfortunately Danni was unable to make it on the afternoon, however I was very lucky to have a small group of very supportive teachers from Glenbrae school attend. After going through the presentation we began screencasting (most of the teachers had a go at creating a screencast for parents or staff on how to access something on their blog or site). Not only was it great to support the staff and guide them through how to screencast, I also learnt equally as much along the way. By the end of the session we had created some great screencasts and I also worked with a teacher to edit his screencast in iMovie. I thoroughly enjoyed the session and look forward to hosting another toolkit in the future!
Here is the presentation created by Danni and I:
Here is a link to step by step instructions on how to screencast on a Mac using Quicktime Player.
Instructions on Screencasting - Mac
On Friday Michelle and I also began filming our class for our 2016 Manaiakalani Film Festival movie. The children were all very excited to be involved and luckily for us the weather held. Over the next week we will begin editing our footage and complete the final parts of filming. Watch this space!
Subscribe to:
Comments (Atom)


